A Picture Is Worth A Thousand Words as the old saying goes, which is as true today as it ever was. Even the most detailed descriptions here on the Multitool Encyclopedia can be enhanced with a good photograph or two. And although photographs can be linked to from anywhere on the web, you are encouraged to upload them directly to our Gallery section so that the links will never be broken in the future.
The following is a brief explanation on how to go about adding photos to your Wiki page.
You are encouraged to upload any new pictures into the appropriate gallery. (If the right gallery does not yet exist, you can create it by first clicking Galleries, then click the "create new gallery" link)
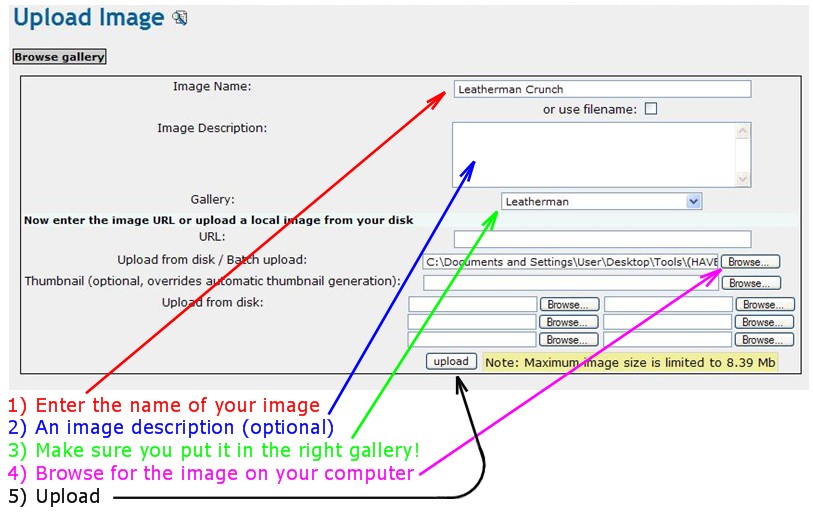
Then simply follow the steps shown above. Note that there are many blank fields on this screen, but you only need to fill in three of them (Image Description field is optional) then click the upload button.
As with many things computer-related, uploading and using pictures on a Wiki site may seem complicated at first. But after doing it a time or two, you'll likely find it to be rather simple. Go ahead, give it a try and find out for yourself!
The following is a brief explanation on how to go about adding photos to your Wiki page.
Who can add pictures?
Any registered user can add pictures to the Multitool Encyclopedia. These pictures are then available in the galleries for browsing, or can be added to existing tool pages or used on new tool pages. Note that pictures of 800 pixels in width or less work the best. Use the photo software on your computer to shrink oversize pictures down to size before uploading. Microsoft Paint is entirely adequate for this.Galleries
The Wiki software stores pictures in Image Galleries. You can browse through the Available Galleries by clicking the link on the Home Page, or at any time by clicking the Galleries link located along the left side of the page. Note that there are many different galleries, such as Al Mar, Buck, Leatherman, Manufacturer's Info, Victorinox, etc.You are encouraged to upload any new pictures into the appropriate gallery. (If the right gallery does not yet exist, you can create it by first clicking Galleries, then click the "create new gallery" link)
Uploading Images
In most cases the appropriate gallery already exists. To upload a new picture, simply click the Upload Image link along the left side of the page. You should then see a screen that looks like this:Then simply follow the steps shown above. Note that there are many blank fields on this screen, but you only need to fill in three of them (Image Description field is optional) then click the upload button.
Image code line
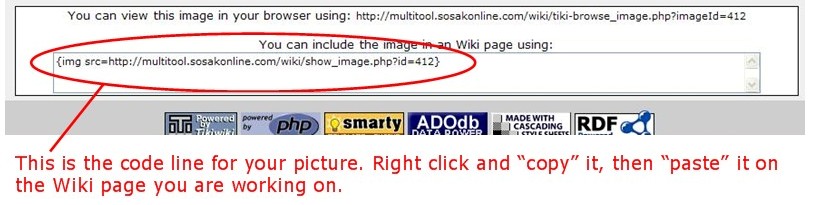
"Okay, I've uploaded my picture, so now what?" After uploading your image, there will be an UPLOAD SUCCESSFUL! announcement, along with an image of your new picture. At the very bottom of the page there will also be a line of code that looks something like this:Using Gallery Images in your Wiki pages
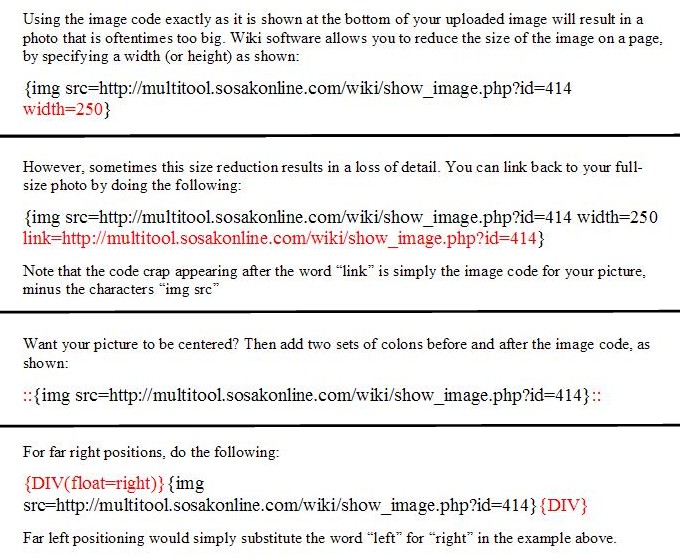
There are many different ways you can manipulate pictures on your Wiki page. The picture can be centered, or it can be located at the far left or the far right. The picture can be adjusted smaller to better fit the layout of the page. It can also contain a link, which could either lead to a full-size image of the picture, or to another page in the Wiki. All of this is done using the image code described above. Here are several examples:As with many things computer-related, uploading and using pictures on a Wiki site may seem complicated at first. But after doing it a time or two, you'll likely find it to be rather simple. Go ahead, give it a try and find out for yourself!
;)